
Slimbook Battery 4 is the new version of the application to control and increase the battery life of laptops.
Here are some of the most visible changes:
- New interface
- Draggable window
- Skipping password asking
- Added brightness switch
- Added TDP sync option
- Added splash window
- Show warning if device has been plugged to AC more than 15 days.
In this version, this simple application offers a wide range of possibilities, thanks to it’s integration of other applications, services and drivers, such as TLP, Intel_pstate, AMD and NVIDIA.
This means that this application is not just compatible with Slimbook laptops, but also with many other different computer brands and manufacturers who work with Ubuntu and derivatives.
The application implements three different energy modes: «energy saving», «balanced» and «maximum performance». Each energy mode comes with default values, but the user is allowed to change the most important values, to adjust or avoid errors in their hardware.
The energy saving applications like TLP focus on reducing power consumption when the computer is in battery mode, by disabling extra options that are not being used.
Visit our
![]()
| Announcement: Support the development of our apps by joining our Patreon and get early access to new app releases and exclusive goodies. |
You can download Slimbook Battery from our application download center for Linux, with our repositories in Launchpad. You can also do it in a Terminal (Ctrl+Alt+T):
sudo add-apt-repository ppa:slimbook/slimbook sudo apt-get update |
By doing this we will have added the Slimbook repositories. Now we will execute the next command to install the application:
sudo apt-get install slimbookbattery |
Now, you can start the application, and select a "energy profile" in the trayicon.
This app has been tested in desktops: Unity, GNOME, KDE Plasma, Cinnamon and Pantheon.
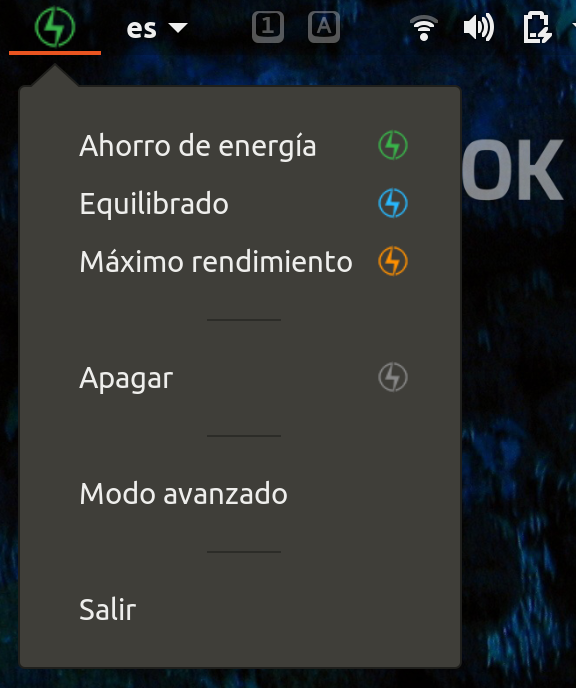
Slimbook Battery contains:
The first three buttons are used to switch between the different energy saving modes (Energy saving, balanced and maximum performance). The following should be taken into account:
The indicator icon of the bar will change color to the corresponding one with its mode: green (Energy saving), blue (Balanced) and orange (Maximum performance).
We will know that the application is not using any mode when our bar indicator icon is gray.
The fourth button (Off) will allow us to deactivate the energy saving mode that is being used at that moment. Our laptop will be back to normal power consumption.
The fifth button (Advanced mode) will open the application preferences window of the application to be able to configure it. We can also view battery information and information about the application. We will talk more in detail about this later.
The last button (Exit) allows us to close the application and deactivates any energy saving mode that was active at that moment.
If during the use of the application you want to configure more options, or have noticed that performance is not what you want, you are able to configure each of the 3 predefined modes.
When selecting the Advanced mode option in the menu, a window will open, there we will find different tabs with options offered by Slimbook Battery:
General configuration tab (General):

- Power On / Off: Enables or disables the use of the current energy saving mode to return to the normal power consumption of the laptop.
- Autostart application: Enables or disables Slimbook Battery autostart and TLP autostart with the system.
- Icon on the taskbar: Shows or hides the bar indicator icon.
- Working mode in case of battery failure: In case the power supply that is being used is not detected, it defines with what configuration it works (AC or Battery)
- Remember to disconnect charger: If you stay 15 days connected, this option will notify you to disconnect charger.
- Synchronize battery mode with TDP Controller mode
- Actual energy mode: You can choose the energy mode that you want to use, in case you decide to turn on Slimbook Battery.
Battery Cycles configuration tab (Cycles):

- Enable / Disable cycle alerts: Enable or disable screen alerts for battery cycles. You are notified when your laptop reaches the maximum or minimum battery charge defined, depends on your battery state (charging/discharging).
- Max battery value: It establishes the maximum charge level that we want in our laptop while is charging. The system will alert when you arrive to the maximum charge capacity.
- Min battery value: It establishes the minimum charge level that we want in our laptop while is discharging. The system will alert when you arrive to the minimum charge capacity.
- Number of times: Set the number of alerts that we want the system to show us when minimum or maximum value is reached.
- Time between warnings: It establishes the waiting time (seconds) between the alerts displayed by the system
Tabs configuration of the three energy saving modes (Energy saving, balanced y maximum performance)

Here the configuration is divided into:
- Battery mode parameters: Changes that apply only when the laptop's battery is being discharged.
- Persistent changes: Changes that apply regardless of whether the laptop is being charged or not
- Limit CPU profile: A mode is selected to choose the limitation level of the CPU. This option will affect the performance of the computer to reduce energy consumption.
- CPU scaling governor saving profile: A mode CPU scaling governor is selected.
- Graphic card saving profile: Energy saving is activated for graphic cards. In case of the Intel and AMD cards it simply reduces the resources you use, in case the Nvidia card will use the integrated card instead of the dedicated one that was being used.
- Sound power saving profile: Enables the energy saving mode for audio. This can cause small tics to be heard.
- Wi-Fi power saving profile: Enables energy saving for Wi-Fi. Enabling this option may cause instability if you are away from the Wi-Fi network access point.
- Bluetooth disabled when not in use: When it takes a while without using Bluetooth, it will be automatically deactivated to save energy.
- Wi-Fi disabled when not in use: When it takes a while without using Wi-Fi, it will be automatically deactivated to save energy.
Battery mode parameters:
- Set screen brightness: Sets the default brightness for that energy saving mode.
- Disable animations: Disable all the animations from system graphic interface in that energy saving mode.
- Bluetooth don’t boot on start: Bluetooth won’t be enabled at system startup.
- Wi-Fi don’t boot on start: Wi-fi won’t be enabled at system startup.
- Disable Wi-Fi when LAN is connected: When an Ethernet network cable is connected to our laptop, the Wi-Fi will automatically turn off (Then it will turn on when LAN is disconnected).
- Autosuspend USB ports: Autosuspends the USB ports of our laptop. USB-connected devices such as the mouse, keyboard or scanner are excluded by default from autosuspension.
- Excluded USB IDs from USB autosuspend: the IDs of the USB devices will be added to the blacklist to be excluded.
- You can see the IDs of the USB ports by hovering the mouse over the blue icon with an interrogation symbol. The IDs will have to be entered manually and the IDs will be separated by a space.
- Exclude bluetooth devices from USB autosuspend: Excludes from USB autosuspension the bluetooth devices that are connected by USB.
- Exclude printer devices from USB autosuspend: Excludes from USB autosuspension the printer devices that are connected by USB.
- Exclude Ethernet devices from USB autosuspend: Excludes from USB autosuspension the Ethernet cables that are connected by USB.
Persistent changes:
Disable USB autosuspend mode upon system shutdown: Disables the USB autosuspend when the system is turned off.
This is an alternative solution in case suspended USB devices interrupt the system shutdown process.
Laptop's battery information tab

Here you will see the different information
obtained about the battery that the laptop has connected. If any of the
parameters aren't identified, "Unknown" will be shown.
Parameters:
- Battery device: Name given by the system to identify the battery.
- Manufacturer: Brand of the battery that has installed our laptop.
- Battery model: Model of the battery that has installed our laptop.
- Technology: Technology used by the battery.
- Remaining battery: Current percentage of laptop battery.
- Maximum capacity: The maximum battery percentage that the laptop can contain.
- Status: Battery status, charging or discharging.
- Time to full/empty: Remaining time for full charge or full discharge, depending on the state of the battery.
- Rechargeable: Indicates whether the battery is rechargeable or not.
- Power supply: Indicates if the charger is connected.
- Energy full: Indicates the capacity (watts) of the battery when it is charged.
- Energy rate: Indicates the rate (watts) of the battery capacity.
- Voltage: Indicates the battery voltage.
- Last update of the battery information: Indicates the last update date of the battery information.
Information tab

Here you can view a description of the
application we have developed along with a notice about the use of the
application some links to our social media, this tutorial and GitHub. In
addition, acknowledgments have been included to the entities that have
been able to make this possible.
We ave also added a button to
improve failure reporting in the application which generates a report
that indicates some features, specifications and important system
configuration files, aside from laptop information.
In case of
needing to report a bug, we would be grateful if you attach this report
to the bug-report-mail you send. This might make bugs easier to fix.
- Translations:
Currently, Slimbook Battery is available in Spanish, Chinese, English, Portuguese, Italian, ... Many of them have been made by users (Thanks a lot!).
If you want Slimbook Battery to be available in your language, and you want to make the translation yourself; visit our repository where you will find instructions and files to create the translations in any language.
You can also modify existent translations if you find any error. - Code:
You can also contribute to our code visiting our repository on GitHub.
What should I do after install?
First of all, start the main launcher of Slimbook Battery, so that the application will perform the initial configuration that applies the first time it is opened. Now you can start using any of the 3 energy saving modes and access the configuration.
¿What energy level is recommended by you?
The level of energy we recommend depends on the use you give to your laptop. If you are going to give it an office use, performing basic tasks such as surfing the Internet to visit a page, answering emails or writing a document, we recommend using the Energy Saving mode. On the other hand, if you want to give it another type of use that requires more resources for certain applications, it is recommended to use the Balanced or Maximum performance mode.
Why isn't it displayed in my language?
In case the language of the system you use
is not any of the added translations, the application will be shown by
default in English.
If you want Slimbook Battery also to be available in your language you can make the translation yourself, visit our repository where we have uploaded the files to make the translations in any language.
I do not see the Slimbook Battery indicator in the taskbar
This may be because you have the option
“Icon on the taskbar” disabled. If this is the case, you simply have to
open Slimbook Battery Preferences, enable this option and press accept
to apply changes.
If you are using Elementary OS, then you might need to install wingpanel-indicator-ayatana In case it still does not appear, check that you have installed gnome-shell-extension-appindicator.
If you do not have it installed, it would be recommended to do it:
sudo apt-get install gnome-shell-extension-appindicator |
Then, to apply the extension you will have
to reload the desktop with Alt + F2, enter r in the window that appears
and finally press the Enter key.
Finally, to activate the extension
in your system, you will have to go to Tweaks and in the ‘Extensions’
tab you should enable ‘Ubuntu appindicators’. Then, the indicator should
appear.
How to uninstall Slimbook Battery
To uninstall Slimbook Battery:
sudo apt purge slimbookbattery |
To uninstall TLP:
sudo apt purge tlp tlp-drw |
I have another problem or doubt about Slimbook Battery, who can I contact to solve it?
You can contact us for anything you need regarding Slimbook Battery by sending an email to: [email protected]
We would appreciate that you attach the file that is generated by clicking on the Generate report button of the Information tab in Slimbook Battery Preferences, as it helps us in a great measure to continue improving Slimbook Battery.